Close to my Heart scrapbooking and cardmaking products

I'm an independent Close to my Heart consultant! If you're interested in our wonderful line of products, you can check them out or order online on my website at: Francine.cmth.com.au


Showing posts with label Southern Girls. Show all posts

26 January 2012

Wetland - white on white


Oh my, I have been neglecting my blog lately, haven't I? I haven't posted in almost three months! It's not that I haven't done any scrapping, although I haven't done much, it's just that life, and a broken down computer got in the way! But, I have some time, and the computer is fixed so I have something to share with you all.

It's been a while since I did any challenges at SouthernGirls so I thought it was about time! The current challenge appealed to me - White on White. I quite like monochromatic challenges and I have recently received a ton of die cuts and embossed pieces of paper from a swap on my members only site - The Crop Room.  I had a sketch from Becky Fleck of Page Maps that I liked with lots of little squares and figured I could use lots of embossed paper pieces from the swap as well as making a few more with some of the embossing folders I received for hosting the swap. I had fun going through my stash to find white embellishments too. Once I had found everything cut and/or embossed the papers, the layout came together really quickly and I absolutely love the result! I love how the colour photos really pop out of all the white. Want to see?


It's interesting that all these papers looked white individually, but once they came together the difference in the whites is amazing. I love it! I will try and tell you what each square is from left to right starting in the top row:
  • embossed with Cuttlebug Swiss Dots, flowers were an op shop find (stud earrings) with sequin leaves
  • ? -  one of the embossed papers I received for the swap. It's on a shiny kind of plastic (thanks Jenny)
  • embossed with Cuttlebug folder with vines and little birds - can't find the name of it (thanks Janice), and pearls
  • photo
Second row:
  • left over scrap of flocked paper from an LSS challenge kit. Sticky backed pearl
  • photo
  • piece of photo paper wrapped with ribbon through a (Junkitz?) buckle, pearl
  • embossed with The Paper Studio script folder (thanks Nita), ribbon scrap, photo clip and sticky backed bling
Third row:
  • Cuttlebug vine and bird folder, pearls
  • magic mesh over paper with die cut from teh swap (thanks Nita) and bling brad
  • photo
  • ? - embossed piece from the swap (thanks Kathy)
Fourth row:
  • photos
Fifth row:
  • as per second square in the top row
Sixth row:
  • left over scrap of  glittery vellum from an LSS challenge kit, on top of a plain piece of white paper. Sticky backed bling
  • left over scrap of flocked paper from an LSS challenge kit as per second row, first square. Sticky backed pearls
  • embossed with Cuttlebug folder with swirls (thanks Janice)
  • photo

Butterflies from the swap (thanks Nita). I embossed the bottom one with the vines and bird folder, and the middle one with the Swiss dots folder. I punched the top corners of the journalling tag with an EK Success corner punch. The 'Wetland' part of the title is a photo of the sign at the wetland, and the little letters are my Carolees Creations. More sticky backed pearls and bling, all on top of a piece of Bazzill white cardstock, and the layout is done!

I'm really pleased with the final result. Is it uncool to pin yourself (on Pinterest)? I just might!

Till next time - happy days!
Francine

12 October 2011

Online Crop Weekend - Part 3 - Layouts

There were four layout challenges in the online crop weekend that I participated in, and I finished three! That's pretty amazing for me since I'm such a slow layout maker. Even better was that I could make a layout for the latest Southern Girls challenge about men/boys at the same time! Here's the layout I came up with about my son (I don't usually blur my kids faces, but decided I should this time).
This layout was based on this sketch by Julie Bonner. In place of the journalling circle in the bottom left corner, I put a medallion made with my EZ Cut- Fold flower #5 die instead.  This is a simple layout, but I think it turned out pretty well. 


The second layout was another sketch challenge. I can't read the signature on the bottom so I'm not quite sure where it came from, sorry :-( I decided to make it about Spring in Canberra. These photos were taken a week or so ago. I so love all the flowering trees around Lake Burley Griffin! The layout is a bit busy I think, but it's starting to grow on me.  


I used one of the flowers I made for the 'make your own flower' challenge (see right), as well as the Marianne Creatables butterfly die. (To those of you who regularly read my blog I can hear you saying "again?!") I also used my MFT Die-namics decorative doily die to make the journalling spot.  


The chipboard flower is from my TLC stash, and the flower beads and glitter letters - who knows where and when I bought those! All the papers are scraps from other projects. I also used some glimmer mist over a tree mask from Tattered Angels on the background cardstock. That's the first time I used that mask which I got as part of a mini album kit (still unmade). 


I love how the last layout turned out. The challenge was to make a no picture layout. I've wanted to record a particular comment from my daughter for some time and didn't know how, but this challenge was perfect! The story goes that my husband has been going interstate quite regularly (as in weekly!) and every time he returns my daughter asks "Did you bring me a present?" It's become a bit of a joke and I just had to record that! So, I had lots of fun finding scraps of paper and ribbons to make presents. I also created three, monthly calendars from an online site (calendarlabs.com) which I altered slightly in MSWord then printed out. I added places he went (well, I actually made them up since I can't keep track of all the dates!). Then I put them all together and this was the result. I love it! What do you think?


Well, that's it for me today. Till next time, happy days!


Francine

5 September 2011

10 Years, 10 Houses

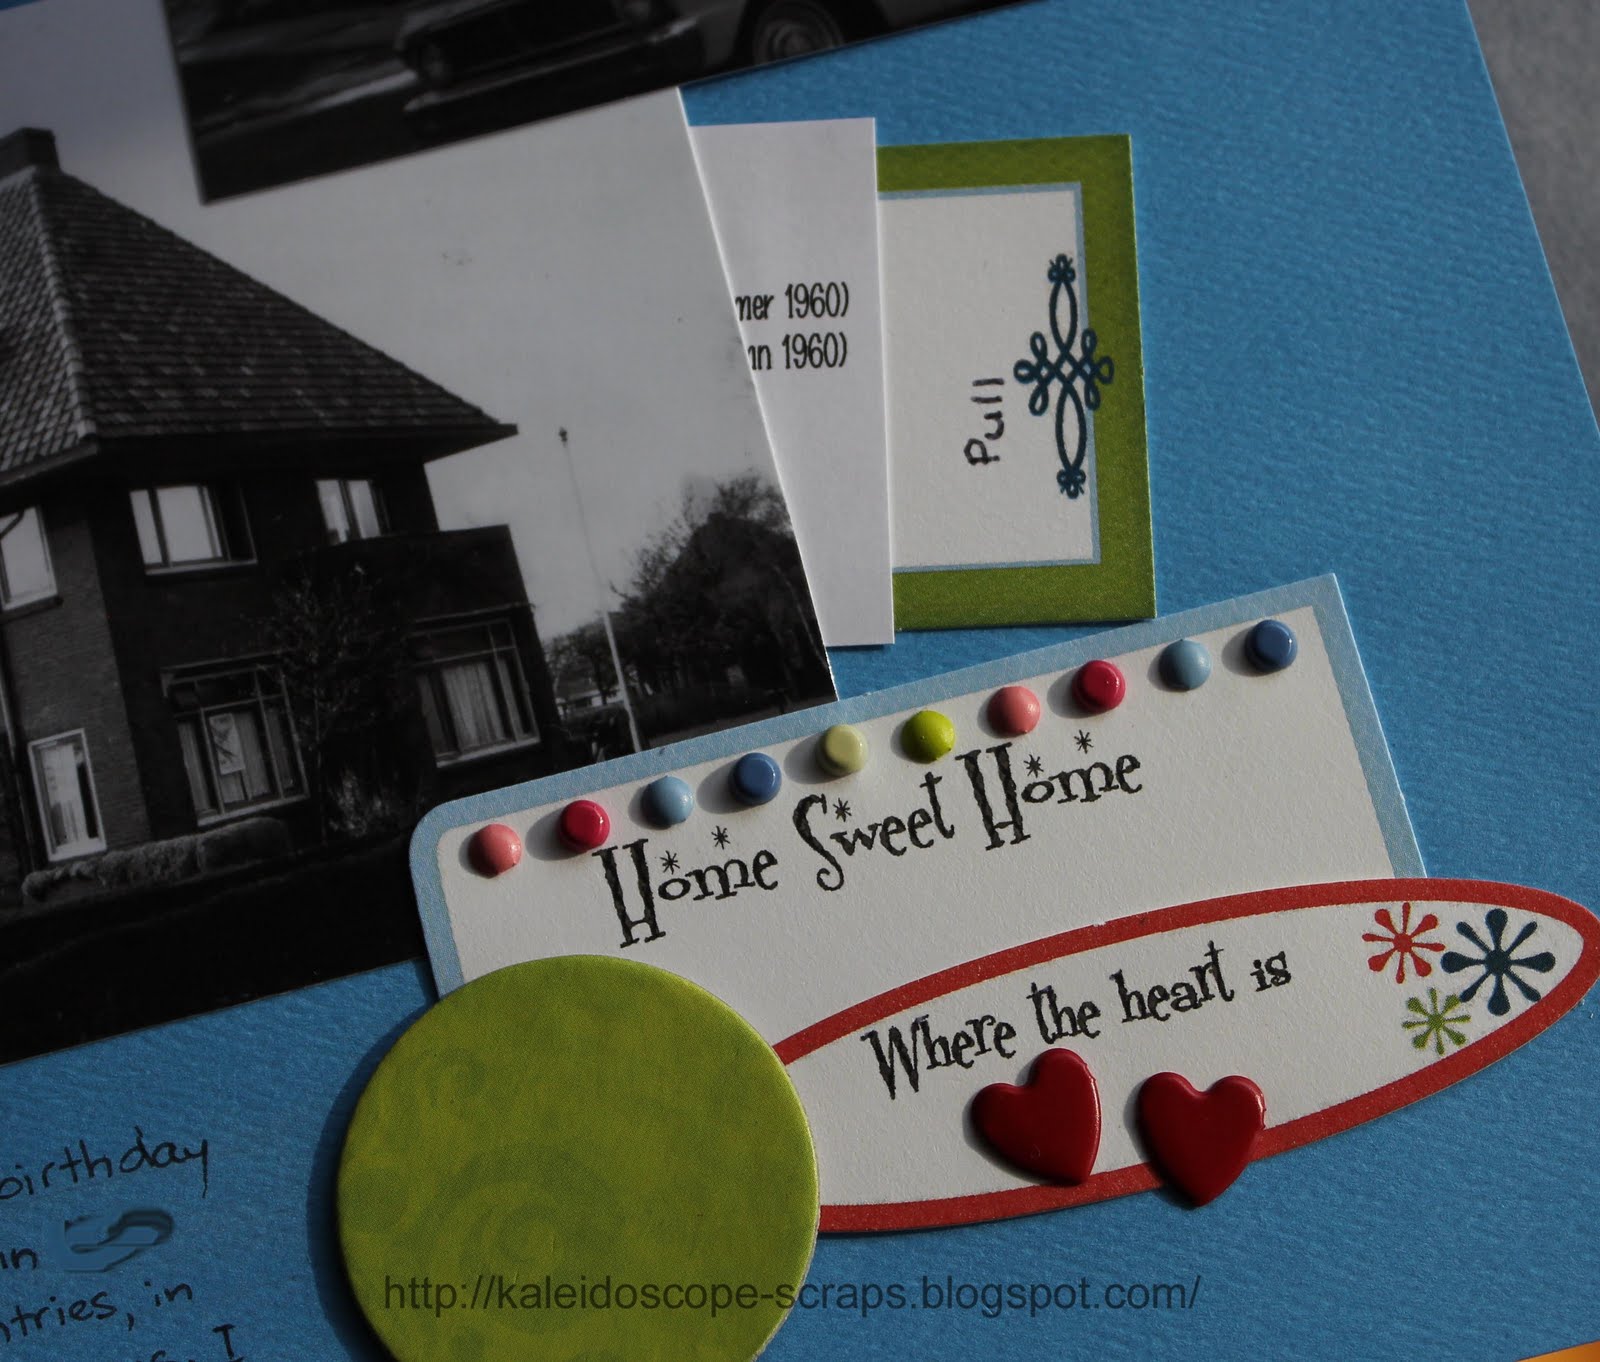
Just a quick post to show you my latest challenge entry. This one is for Southern Girls Decade Challenge. When I was ten I remember my mother telling me that in my first ten years of life I had lived in 10 houses already! So – that’s my decade, and this is my layout – 10 years, 10 houses. I used cardstock and papers from the TLC Runway Retro collection. The ribbon, ribbon slide, number stickers and labels in the bottom right are all part of the same collection. The chipboard circles are also TLC, but from another kit – I can’t remember which one. I added a few brads, some Dymo tape and a house ad from the 1950’s that I downloaded from Tack-O-Rama. For the title, since I’d already used the 1 and 0 stickers, I cut around the little patterned bits that were left over after removing the sticker and used them instead (see, I never waste even the smallest bits!) I created a hidden journaling card behind the bottom picture and listed the addresses of all 10 houses. Thankfully I had the list from the 50th anniversary album I created for my parents a few years ago. My mother has a great memory and could tell me all the addresses!


I used sketch #62 by Susan Stringfellow from Sketch Savvy (although I flipped the photos horizontally).


Till next time, happy days!

Francine

7 August 2011

A Touch of Frost


I love how this layout turned out! I made it for the Southern Girls Challenge. This time it was a photo inspiration challenge with this photo of a tree on a frosty morning. Well, at the end of July we were having lots of frosty mornings, and one morning I ventured out to take a photo of the camellias which were covered in frost. So, I figured this was a good subject for the layout. The colours are nothing like the inspiration photo, but the idea was still there!
As anyone who has been reading my blog regularly will know, I love sketches. Well, I recently discovered a new site and it’s great! It’s called Sketch Support. Not only do they have sketches but you can download them for printing and they also include measurement and placement information as well as ideas for variations on the sketch. Go check it out! So, I was absolutely smitten by their last sketch and used this as the base for this layout.

I used a lot of things from my stash – leftover scraps of papers, Heidi Swapp ‘bordeaux’ ghost alphabet, Zva Creative bling (cutting off the flowers at the ends of the swirls), white Porta Craft pearls, white brads, an (originally black) CM snowflake die cut, and white sparkly string/thread.


After cutting the background papers, I covered one piece of pink cardstock with the white mulberry paper, and the other piece I embossed with the Cuttlebug ‘distressed snow’ folder. I then inked the raised areas with white Versamark ink and heat embossed it with some CM clear embossing powder mixed with dazzling diamonds.

After sticking the papers and photos down I remembered that I had some ‘pink taffy’ Glimmer Mist from a kit I’d bought and not yet made up and decided to mist the white (Bazzill) cardstock with that. I put down the ghost letters first as well as some punched snowflakes (using CM snowflake punch and Sullivan’s starburst punch) in the top corner and cut out some scrap paper to just cover the photos. I like how it turned out, even though I really should have misted before I attached the photos and paper!

I painted the black die cut with gesso and put some of the embossing powder/glitter mixture on before it dried to add some sparkle. I attached the ghost letters with the sparkly string/thread and cut the rest of the title out of the same paper as the middle rectangle with Cuttlebug ‘Baby Face’ dies (now discontinued), only I painted them with ‘moonlight’ Smooch. As I don’t like to waste anything, I embossed the centre of the acetate O with the distressed snow folder and cut out the resulting snowflake. It's right there under the R and the O - see?! (Aside: I have lots of those chipboard centre pieces from A’s, D’s, O’s, P’s, etc hanging around in my stash waiting to use on something one day, so I was pleased I came up with this idea for the acetate!)

After putting it all together I realised that I had nowhere left to journal so used more of the same papers to cut out the three pieces on the bottom left using my Papertrey Ink dies (fillable frames #10 and Limitless Layers: 1 3/4" Circle Collection). I covered one with the same white mulberry paper, dry and heat embossed the other, and wrote the journaling on the third piece.

Altogether I really like how this turned out, and I hope you do too.

Till next time, happy days!

Francine

27 June 2011

Rock Art (at Fantail Falls)


I finished this layout quite a few days ago but I seem to run out of time when it comes to posting these days. I'm entering this layout in the Southern Girls Challenge, anything goes. Unsurprisingly there are 100's, literally, of entries this fortnight! So, maybe mine will take it up to 400...


I was originally going to make this layout for this challenge over at Apron Strings (using Blue and white), but once I started it wasn't turning out any good so I canned that idea and sat on it for a few days. And,guess what - shock, horror, I didn't use a sketch!!! That's the first time in ages. Still, I think it looks like I used a sketch - probably because I've used so many now. Despite it not turning out how I first anticipated, I love how it turned out. The muted green of the Kaisercraft papers I think is just wonderful. I picked up the rub on branches at the Craft Show last year for $1 I think, and I love how they look. I also had these rock alphabet stickers that I picked up somewhere some years ago that turned out perfectly for this layout. Too bad there was only one of most letters and I needed 2 Rs but there was only one of those, so had to change to plan B... So, what do you think?

The pictures by the way were taken at Fantail Falls in Mt Aspiring National Park on New Zealand's south island during our Holiday there in January. We had seen a few of these rock piles around the place, but when we turned the corner off the path from the parking lot we were greeted by hundreds of them. Naturally Kyaa had to make one too. She said it was pretty hard to make them balance, but she managed a little pile in the end!

Well, till next time, happy days!

Francine

28 April 2011

Superb Fairy Wren

My latest layout is one I made for the Get Picky Sketch Challenge #7. I combined it with the Southern Girls Green & Blue challenge and came up with this layout about the cute little Superb Fairy Wrens that have been visiting us lately. They’re terribly hard to photograph as they’re so quick and it seems that as soon as I open the back door with my camera, they’re off. Finally one day though I was lucky enough to get a few shots. The male, the beautiful blue one, isn’t often with the group of females, but on this occasion he was. I love these little birds and the lovely twittering that heralds their arrival in our yard.

So much for the birds, here is my layout. I made it completely from scraps and bits from my stash. The cardstock and ribbon are both from TLC, the patterned paper is by Sandylion, the green felt flowers are from Stampin Up!, the title letters are by Portacraft and the little blue flowers, blue metallic thread and green heart buttons have been in my stash for some time.

Logan thought this layout was too plain, but I think its simplicity suits the subject well. What do you think?

Till next time, happy days!

Francine

18 April 2011

Our Team

Here are some more photos from our Otago Central Rail Trail tour (on New Zealand’s south island) in January. The main picture is of the tour group we were with. They were lots of fun. There was another family from Brisbane, Australia, another woman from Brisbane and one from Melbourne. As well, there were three couples from Wellington, NZ, a woman from the UK, and the two guides who were both from Christchurch. At the time I found the going really tough, but in hindsight it was a great trip, due mostly to the fantastic people on our tour. This photo was taken at the bottom of Baldwin Street in Dunedin, purported to be the steepest street in the world. I certainly only ventured part way up – I had to stay behind to set up the tripod for the shot! The two photos at the bottom were taken on the trail. The one on the left was our first day on the trail and is near Chatto Creek where we stopped for morning tea. The one on the right was taken on our last day on the trail and is nearing the end near Middlemarch. I was really struggling against the wind at the time, so stopping to take a photo was a welcome relief. It helped that the scenery was lovely too.

The layout is for the latest Southern Girls challenge, a sketch by Trace Jackson. Interestingly there are not many entries this fortnight. Since the entrants are overwhelmingly card makers, I guess they’re not much in to using sketches. Me on the other hand, that’s my favourite thing! I rotated the sketch 180o, and since it is relatively simple so is my layout, but I like how it turned. I think the emphasis is on the photos which is generally what I strive to do with my scrapbooking.

Everything I used on this layout comes from an old TLC Runway kit called Urban Threads. Much of it has skulls on it which was popular at the time, but I carefully covered all those up! In order to record all our tour mates’ names, I made a pull tag from some of the diecuts in the kit, attached it to a piece of cardstock and slipped it behind the main photo. That way I didn’t need to take up room on the actual layout, because I’m not really sure where I would have put it anyway. What do you think?

Till next time, happy days!

Francine

29 March 2011

Spiders!

After years of drought we've had a very wet year this year, and it has brought green grass (yay!), but also lots of insects and consequently spiders too. I watched a little spider build it's web the other day and went and grabbed my camera to take some shots. Then I went around and found others to photograph too. My kids will tell you that I have an unhealthy obsession of photographing insects, but I love the macro photography! So, I had all these cool photos and what to do with them? Well use them in a layout of course.
The Apron Strings challenge to use a box or block on your layout seemed as good a challenge as any, so I went to the Scrapbooks Etc site and used one of their collage templates to make the block of photos. I used one of their templates for this layout too. It's a quick way of putting a layout together, and very effective too I think.

I used Papers from the Pink Paislee 365 degrees collection, bought from Apron Strings. The white flocked designs are from a leftover strip of paper from my last LSS monthly challenge kit and the design fit very well with the papers. The letters are Scenic Route, also bought from Apron Strings. The finishing touch though is the spider web that I made. I just used some sewing thread, made the lines going out, then would the thread around those strings. I love how it turned out!!!

I'm also entering this layout in the Southern Girls "add an animal" challenge. I think spiders apply, don't you? Might stir them up a bit, amongst all the cute rabbits and bears, LOL!

Till next time, happy days!

Francine

1 March 2011

16 years & counting...

Well, I'm combining challenges again! I used the monthly challenge kit from Wrapped in Paper (who finally have a website, yay!), the sketch from our monthly challenge at the Crop Room II, and added brads and bling as required in the challenge at Southern Girls. Not bad I guess, killing three birds with one stone! So, without further ado - here's my layout

and here is the challenge pack I started with. It contained a piece of lilac coloured Bazzill cardstock, papers from Kaisercraft (I know I often say I dislike the papers in the kit, but this time they were really terrible!) The front sides were way to gaudy and kitsch IMHO (see left hand picture), so I used the backs that were much plainer (see right hand picture), although I did cut some hearts out of the purple coloured paper (the middle one in the left hand picture). There were also five different ribbons/laces - a pink velvet, pink/white gingham, yellow rick rack, red loopy ribbon and white eyelet lace. They actually turned out to be easier to use than the papers! As well there two large chipboard hearts (one with a removable centre) a chipboard crown, and three (round) red buttons.

It took me a while to decide what photos I would use with this kit. I finally decided since there were hearts all over the paper, that I would make a layout with a picture of me and Gary, after all I rarely scrap pictures of me and since we didn't have a recent shot of us, I asked Kyaa to take a picture. She loves using my new camera so was happy to oblige. We even got several good photos where we both look good!
I also decided I'd use this sketch from the CRII challenge. I actually turned the sketch a quarter turn to the right, and then I had lots of fun going through my stash looking for heart embellishments - buttons, brads, bling, stickers, etc.

The paper was a bit bland when I used the back sides, so I stitched the paper onto the cardstock which added some more colour and made it stand out. Stitching also allowed me to stitch on the lace (which I threaded with the rick rack first) as a ruffle and attach the red loopy ribbon all at the same time.
I attached the round buttons from the kit with heart shaped brads. I like how they look. I also found a heart shaped paper clip but wasn't sure how to attach that, but in the end filled it with Diamond Glaze so it kind of became an epoxy like sticker. Worked like a charm! The hardest item from kit to use was the chipboard crown! By putting the shaped paper clip between our heads on the picture though, the crown just naturally seemed to fit above it - so voila!
I painted the chipboard pieces with my twinkling H2Os. I stamped the XOXOXOXO stamp that Kyaa bought me for Christmas onto the white chipboard 1 in the title. The chipboard 16 came from my TLC selling days. I do love those monogram chipboard letters and numbers because you don't have to paint or cover them, but I'm gradually starting to run out of them :( The glitter alphas were a cheap buy from one of the $2 shops around town. I just put them through my Xyron X sticker maker so that I could attach them.
The rest of the hearts were from my stash and have been there for a loooooooong time! I have no idea where they're from. I did cut a few of the hearts out of the patterned paper as I said before, and drew over the words and borders with my favourite Sakura gelly roll stardust pens. I attached some of the hearts with foam mounting tape to raise them up a bit.

All in all, I like how this one turned out. I guess it's good to be challenged to use something you don't necessarily like in the first place and see what you can come up with!

Till next time, happy days!

Francine