Close to my Heart scrapbooking and cardmaking products

I'm an independent Close to my Heart consultant! If you're interested in our wonderful line of products, you can check them out or order online on my website at: Francine.cmth.com.au


Showing posts with label White With 1. Show all posts

28 May 2014

Celebrate! White with 1 May challenge

Here is my latest entry for May's White with 1 challenge - to use white and gold.  I didn't realise how little I have in the way of gold paper until I started searching my stash for this challenge! I found lots of embellishments though, and gold acrylic paint, so that all worked.

I started with a sketch from April 2014 Page Maps. I had been considering entering the layout in their 8th birthday grand prize challenge, but decided against it in the end (and made another layout for that instead!). 

The music paper behind the main photo is from a Kaisercraft 6x6 (Christmas themed) paper pad. The doily I die cut from white cardstock with my Cheery Lynn English Tea Party doily die (one of my favourite dies). Then I painted it with the aforementioned gold acrylic paint.

On the right hand side I cut another piece of white cardstock and put the gold stickers on it. Then I used my Big Shot to emboss it with my Close to my Heart Stripe embossing folder.

Chipboard bookplate, originally pink,
coloured gold with embossing powder
The chipboard bookplate was originally pink. I covered it with versamark ink, then gold embossing powder and heated that up. I wasn't completely happy with the coverage so simply heated it up again and pressed it into the leftover powder I hadn't put back in the container yet. Then I heated that up again to melt the new layer of powder. I haven't tried that before so I was very happy to find that it worked. I put a scrap piece of gold ribbon behind it, added the three plastic flowers and finally topped it with the gold "celebrate" sequin/sprinkle.

White doily die cut painted with gold acrylic paint, topped with organza lollipop flower with button centre and gold butterfly sequins to look like leaves

The lollipop flowers were made using another technique I hadn't tried before. The material, an organza style fabric, was actually a piece of gold wrapping "paper" that we had received a gift in when we were in Singapore. The scrapbooker (or maybe I should say hoarder) that I am, I packed it in my suitcase and said I'll use that one day, and for once I did! I cut circles out of the material and slightly melted the edges with a candle flame, then layered them on top of each other and added a white and gold button in the centre. I love how they turned out! The gold heart paper clip above the right hand flower was attached to the page with liquid glass. It makes for a kind of epoxy embellishment.

For the line of beads, I alternately strung seed beads and bugle beads onto thin gold wire. To attach it I just poked a hole in the paper at each end and pushed the wire through and bent it over on the back of the page. It didn't sit as straight as I would like, so near the centre of each line, I stabbed a small hole in the page and tied the beaded wire down with some gold metallic thread so you really can't see where I did it, especially since the knot is on the backside of the page. To finish off, I added the gold butterfly sequins, gold flower sequins to which I added rhinestone centres, as well as the gold photo corner stickers. Done!

I'm extremely happy with the result and hope you like it too. I love reading your comments, so happy for you to leave me some!


Till next time, happy days!

18 April 2013

Bali Blooms


This latest layout is for the current White with 1 challenge. This month it's white + yellow + sketch. Well, I love sketches and yellow is my favourite colour so how could I resist?!

The most difficult thing with this layout was trying to decide which photographs to use. Once I decided though, the rest was pretty quick. I didn't stray from the sketch hardly at all, other than replacing the tag with another photograph. 

Putting the pieces together was fairly straight forward but I will mention a few little tricks I used.


Sequins sewn on with French knots
I sewed the yellow flower sequins onto the page with French knots. First I marked where I wanted the sequins to go, then I pierced a hole with my paper piercer. I brought the floss up from the back of the paper and through the sequin, wrapped the floss around the needle 3 times then put the needle back through the sequin and the paper and pulled it tight. Then I moved on to the next one and repeated the process until all five were done. 

I lit a candle and brought the ends of the ribbon close to the flame to "melt" the ends to stop them from fraying. I put the tape on the page then laid the ribbon on top so that it would stay straight. 

I placed the Cheery Lynn English Tea Party doily on the edge of the paper so that I only cut a half doily. I did the same with the circle for the centre, thus saving paper. 

For the banner I cut a narrow strip of each paper. I lined up the very end only (where the scallops start) of the Stampin' Up! Hearts a Flutter framelits scalloped banner die on the strip to cut the banner pieces as you see on the layout. I stuck them down with a small square of double sided tape in the centre of each piece, then sewed them on my page (piercing the holes first). I figured why not as I already had the needle and floss out! I tied the bows in the floss then sewed them on too. Sewing on the one on the right had the added advantage of affixing the heart shaped paper clip at the same time!

The largest piece of paper was a bit too dark to match the rest of the papers. I glued a piece of mulberry paper over it to tone it down. It also added some texture to the page.
After running through the Big Shot

To cut the shape at the top of the mulberry covered piece, I centred my MFT Die-namics Textile Rectangle Frame at the top of the paper, then lined up the end of the acrylic plate from the Big Shot so that the end only reached half way through the die and then put it through the machine. Once there was no plate over the die any more it stopped cutting. Then all I had to do was cut the paper across from the sides to where the die had already cut off the rest of the paper.  (I hope that makes sense!)

Cut from paper's edge to die cut edge
So that's it for me today. I'm off to find some pictures for my next challenge. ☺

Till next time, happy days!
Francine

25 March 2013

Las Vegas


Here's my entry for this month's White with 1 challenge - White + Brown + Doodling.

I rifled through my considerable stash and pulled out some brown papers. I also found these small Collections paper squares, washi tape and the fibres. For the doodling, I wrote Las Vegas and LV up the side in brown pen, as well as drawing a couple of little stars and a heart with silver pen.

I had the photos, from our trip to the US and Canada last July, printed some time ago so they were sitting around waiting to be scrapped. While I think the colours in the photos go well with the white and brown I'm not overly happy with the result. Something is missing, but I'm not sure how to fix it. I can't even think of any journalling (which is amazing, because almost without fail I write at least one sentence, but usually more)! Anyway, I don't have any ideas so I'm leaving it there. Do you have any ideas for how to improve this (without starting again from scratch!!)?
On a more positive note - I just went to get the link to WW1 and found that I was one of the winners from last month with this layout! How exciting! Thanks so much. Now .... how to spend my voucher??? 

Till next time, happy days.

Francine

4 February 2013

17 - February White with 1 challenge


Here's my layout for February's White With One challenge to use white + pink + hearts. (Hmm, I'm not sure why there's a shadow down the bottom in the middle, it's not there IRL!)

I already had these photos printed and a sketch picked out (from the September 2012 My Creative Sketches challenge) but it hadn't gone beyond that. This seemed like the perfect way to pick the papers, despite the fact that Kyaa hates pink. I'm really pleased with how it turned out - even Kyaa didn't mind all the pink!

The pink papers are from an LSS challenge win, along with the lace. The stick on pearls and hearts were from my stash, along with the striped paper which is actually a tag from some hair clips. I die cut the title and the two little hearts from it. The silver heart was on the tag already and I liked how it looked with the die cut negative above so I just cut the narrow strip and rounded the corners from the larger tag that it was. I don't throw anything out and eventually it comes in handy like this, or at least that's what I keep telling myself when I look at all my stuff, LOL!

The dies I used were:

Cheery Lynn Heartland of America die (large)
Memory Box Serafina Heart (98278) and matching Cupid Heart (98281)
MFT Die-namics heart from Notched tag set

Till next time, happy days!

Francine

23 June 2012

Sydney at Dusk


I had a friend come stay this month which required me to clean my scrapbooking room, aka spare room. There was no room to even sit on the bed, let alone sleep in it. So, during my clean up I came across some photographs and a page sketch for a challenge from 18 months ago that I never made. The pictures were perfect for this month's White With 1 challenge, so I set about finding papers, etc (after my friend went home that is) and created this.

The challenge to use white + pale blue + flags was perfect, and I was able to use up some more of my large stash of old TLC papers. It turned out much better than using the cream and dark blue papers I had initially set aside.


I die cut and/or embossed all my embellishments. I used these dies and embossing folders:
MFT Die-namics: Banner Day die
MFT Die-namics: Mini pennant die
Spellbinders: ironwork accents dies
Cuttlebug: Curls & Swirls alphabet die
Cuttlebug: Baby Face alphabet die
Cuttlebug Jamara embossing folder

I die cut one of my kaleidoscopes as well.

I made the flags with some die cut triangular banners mixed with the mini pennants. I glued an ironwork die cut on top and wrapped the ends around some blue/white baker's twine. A couple of extra large brads at the end completed the banner of flags.

I added some blue diamante and clear star bling to finish the whole layout.

The sketch I used is one from Page Maps.

Till next time, happy days.
Francine

28 March 2012

Breaking Dawn


Well ok, so my title isn't in fact Breaking Dawn, but rather Dawn Breaking (over Lake Burley Griffin). In my defence however, I had always intended to title my layout Breaking Dawn, it's just that I couldn't put the longer word at the top in the space because it would have looked funny, and with the subtitle it didn’t sound right either, so Dawn Breaking it was! Whatever the title though, I love how this layout turned out! It's my latest entry for the White with 1 challenge. This month's challenge was white + kraft + layering.

It was hard deciding whether something was classified as kraft or not, but hopefully I haven't really strayed from the rules, since I decided to consider anything that was a kind of beigey colour as kraft. That's how I interpreted it anyway and so this is what I ended up with.

I once again scraplifted this fabulous layout by CelesteVermeend. I scraplifted it once before too, here. Celeste's style really appeals to me, and I love her work, especially this particular layout, although I'm not even sure exactly why. But there you have it!
 

So, after gathering all my papers together I started cutting out pieces. I embossed almost all the cardstock pieces, and die cut lots of papers too. Everything comes from my scraps stash. The embellishments too are from my stash, the metal heart and the little humming bird have both been in there for about 7 years now I think! The Awesome (Memory Labels) tag and the flower (Magnolia Julia by Prima) were both hostess gifts for hosting a die cut swap, and some of the die cuts on here are from that swap as well. Other cutting dies and punches from my own collection that I used were:
the rectangle from the layered label die,
Stampin Up! label punch
The embossing folders I used were:
Script folder by The Paper Studio
Cuttlebug Swiss Dots
Couture Creations Houndstooth, and
Couture Creations Drink Me.
The jute was saved from a clothing tag, the letter stickers are from Kaisercraft (Duchess Collection) and Adornit (tiny etched natural). All the inking was done with Frayed Burlap Distress Ink.
 

I think this layout turned out  great, and there certainly is a lot layering. I actually laid everything out before I stuck it down, then took a picture so I could recreate it as I stuck all the pieces down! I'd love you to leave me a comment and tell me what you think.
Till next time, happy days.
Francine

31 October 2011

Magnolia

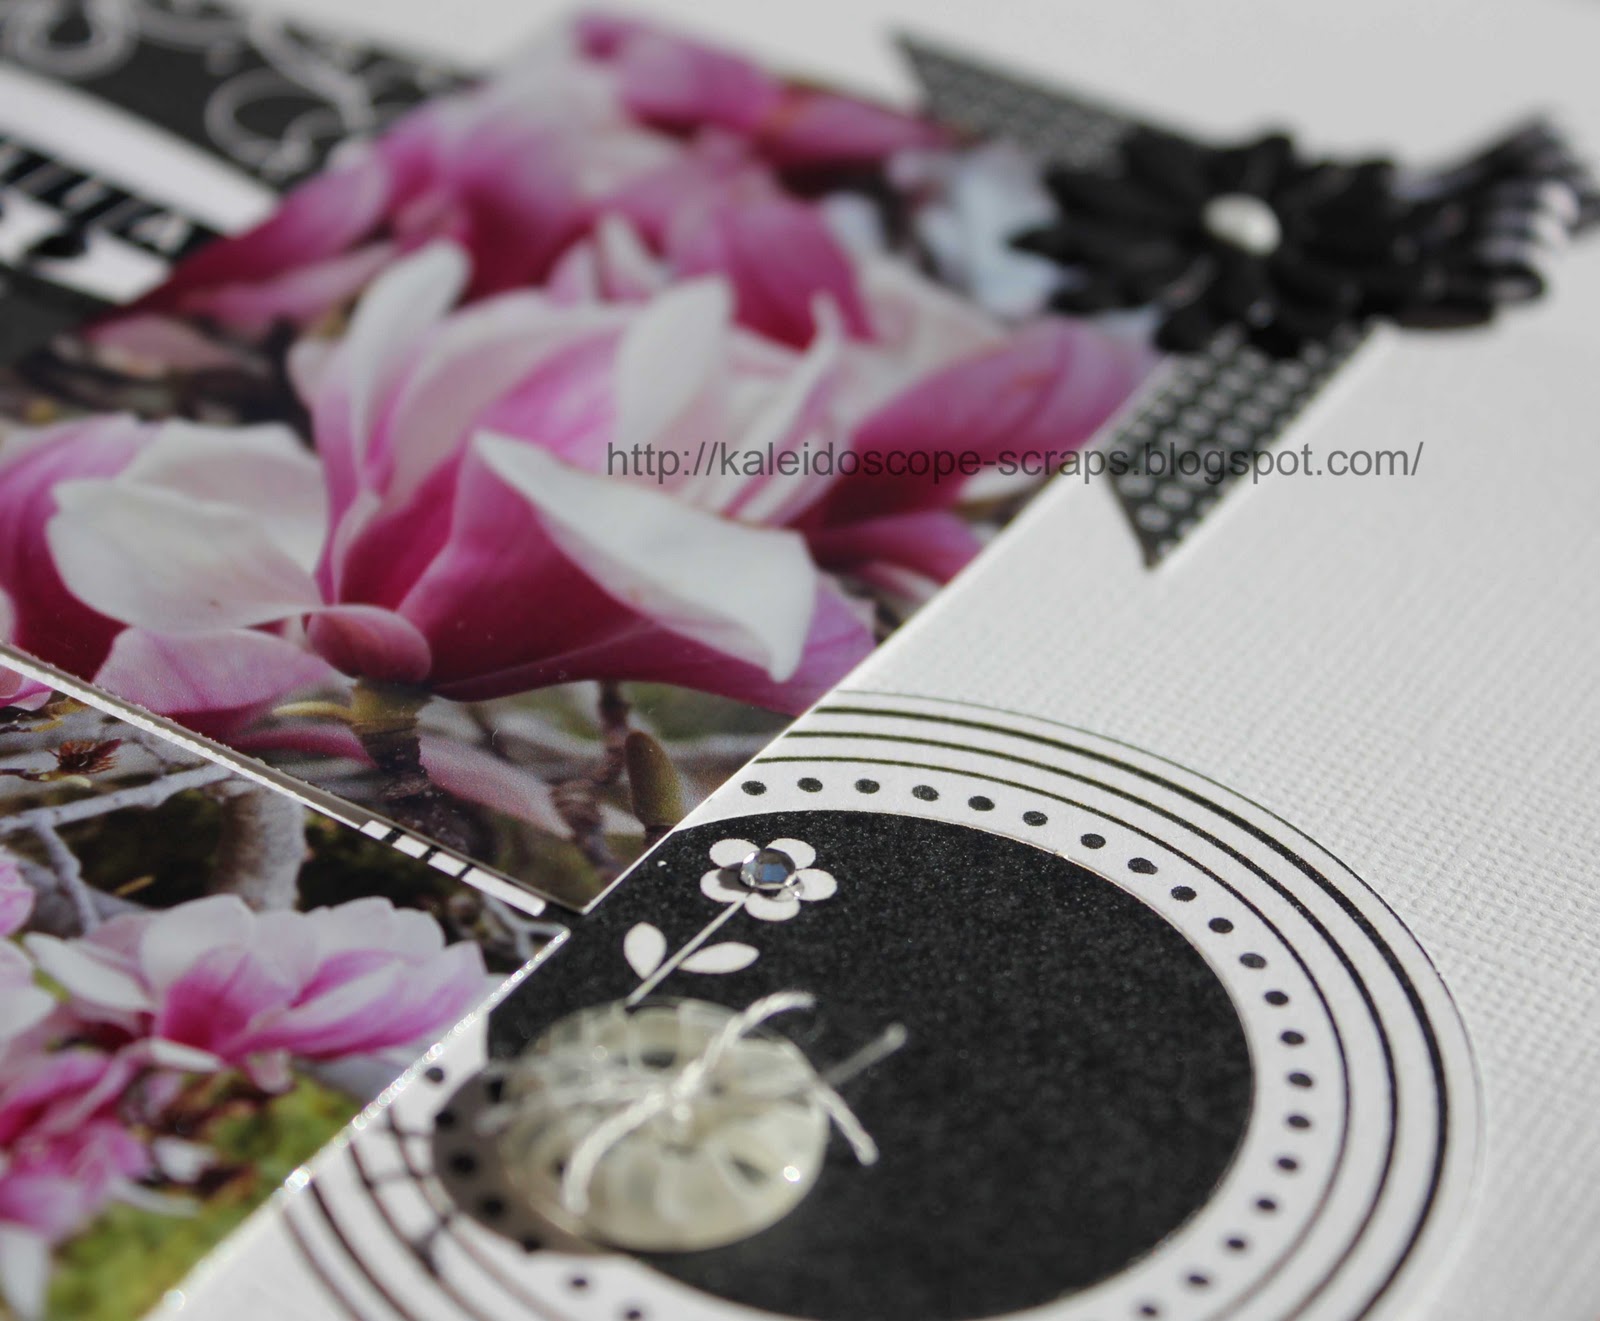
I've been really busy with challenge entries this month and finished one last one just in time! I decided to enter the White with 1 challenge for the first time. This month's challenge was to use a white background with black and paint/mists. While I don't mind black and white, I prefer colour, so decided to use colour photos with the black and white background and I think it looks pretty good. 


I started with a sheet of white Bazzill cardstock, and attached a couple of strips of gyprock tape. I then swiped some black (Kaisercraft) paint across the gyprock tape and then removed the tape, leaving a square pattern on the cardstock. I also inked the edges of the cardstock with soot black distress ink. 


I used a Page Maps sketch as the basis for the layout, and stuck pretty close to it. 


TLC rubons
Earring (?) Op Shop find

The paper for the bracket square, the die cuts, ribbon and rubons are all part of a TLC Runway kit from my TLC days. I created the bracket square in PSE, printed it on a piece of scrap paper to check the size, then copied it to the patterned paper and cut it out. 


Joy Crafts daisy die flower
The papers for the circle on the left were left over from a monthly Wrapped in Paper challenge pack. I added some clear and black rhinestones and a button from my stash, as well as a mother of pearl earring (?) front that I picked up at the Op Shop. The flower in the top right hand corner I cut from a scrap of black cardstock with a Joy Crafts daisy die. the title was made from Kaisercraft mini black & white letters and I stitched a white edge around the bracket square with a bit of white floss. 


Until next time, happy days!


Francine